
This tutorial will show you how to add an image gallery into a WordPress page or post.
It builds on more basic WordPress knowledge—so if you don’t already know how to edit your WordPress posts and pages, check out our Welcome to WordPress tutorial for basic concepts, and Creating & Editing Pages tutorial for an introduction to the WordPress editor. Otherwise, read on!
Note: Galleries were changed significantly in WordPress version 5.0. If you’re working with a newer theme designed for the latest WordPress, you should instead see our Working with Gallery Blocks tutorial.
Note: Galleries are a core part of WordPress, but many themes and plugins also change the way they work. If you have installed your own theme, you may find that the method described here doesn’t work. In this case, you will have to ask the developer of your theme (or gallery plugin) for instructions.
Creating a New Gallery
We’ll begin with a blank page for our gallery, but you can also use this method to add a gallery to an existing post or page, if you prefer.
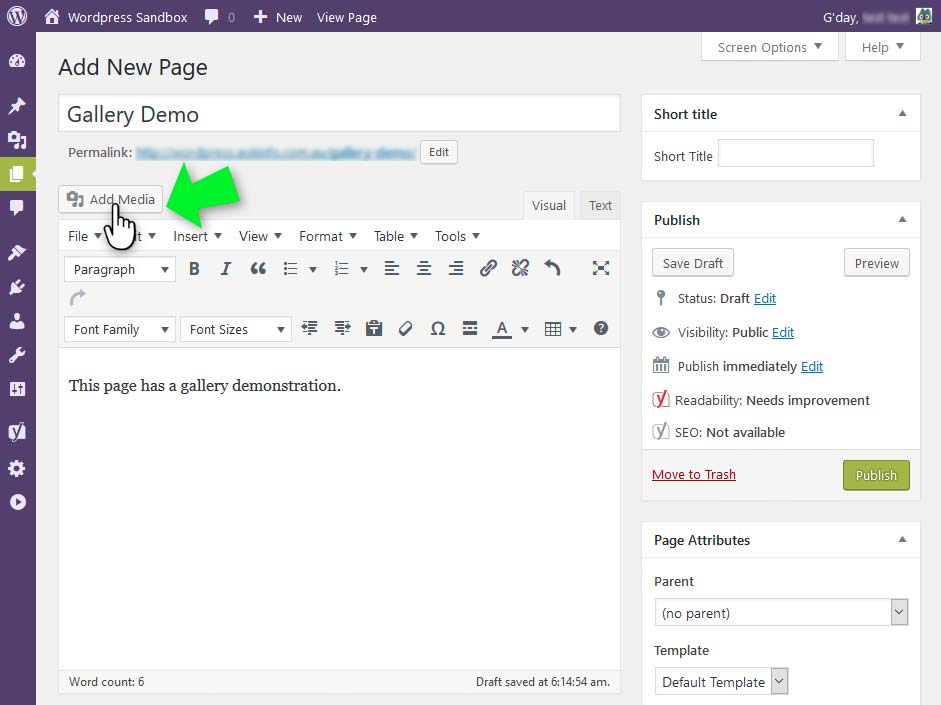
Step 1: Insert Media into a Post
Place your cursor in the editing area at the point where you want to insert the gallery. Then, click the button above the editing area that reads “Add Media”.
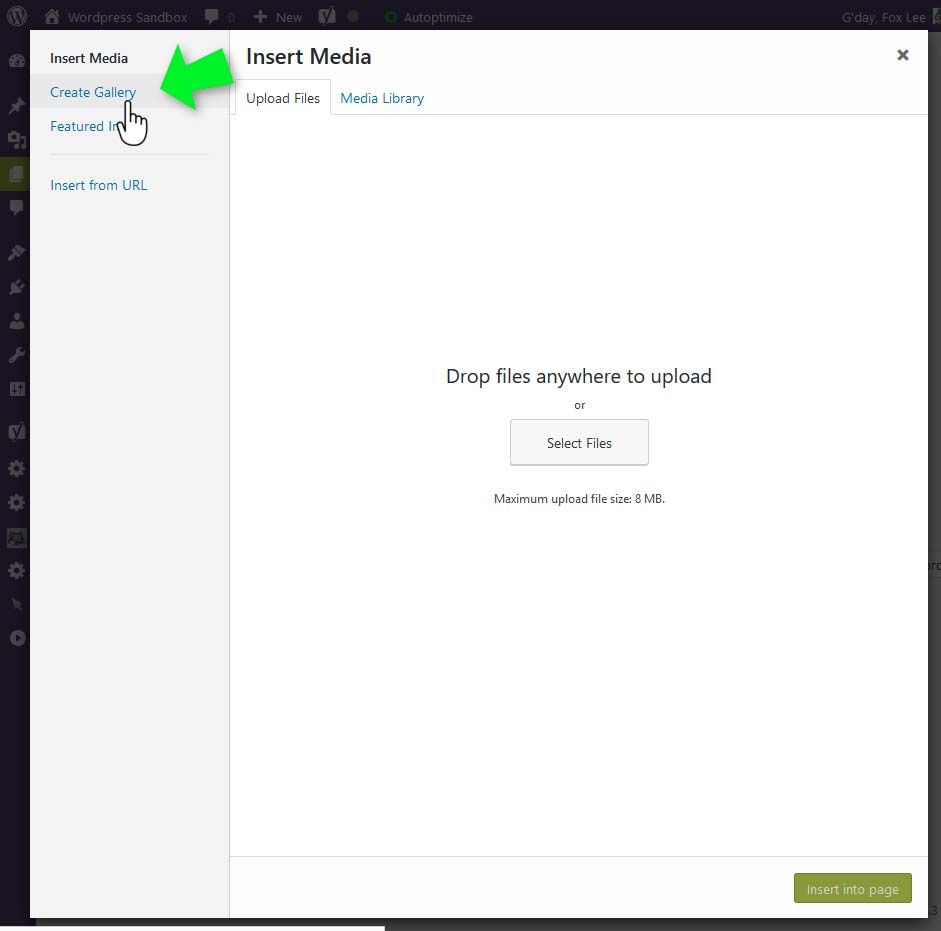
Step 2: Choose to Create a Gallery
This brings up the insert media screen, where you can choose media items from your library, or upload new ones. But first, click the link in the left-hand panel that reads “Create Gallery”.
Step 3: Choose Images to Include
With “Create Gallery” highlighted, you can choose media items you want to include in the gallery by clicking on their thumbnails.
A tick will appear on the corner of items you have selected, and they will also appear in a row at the bottom of the window. If you decide you don’t want to include an item, just click on the tick mark, and the item should be unselected. You can always add or remove items later, so don’t worry too much about making a mistake.
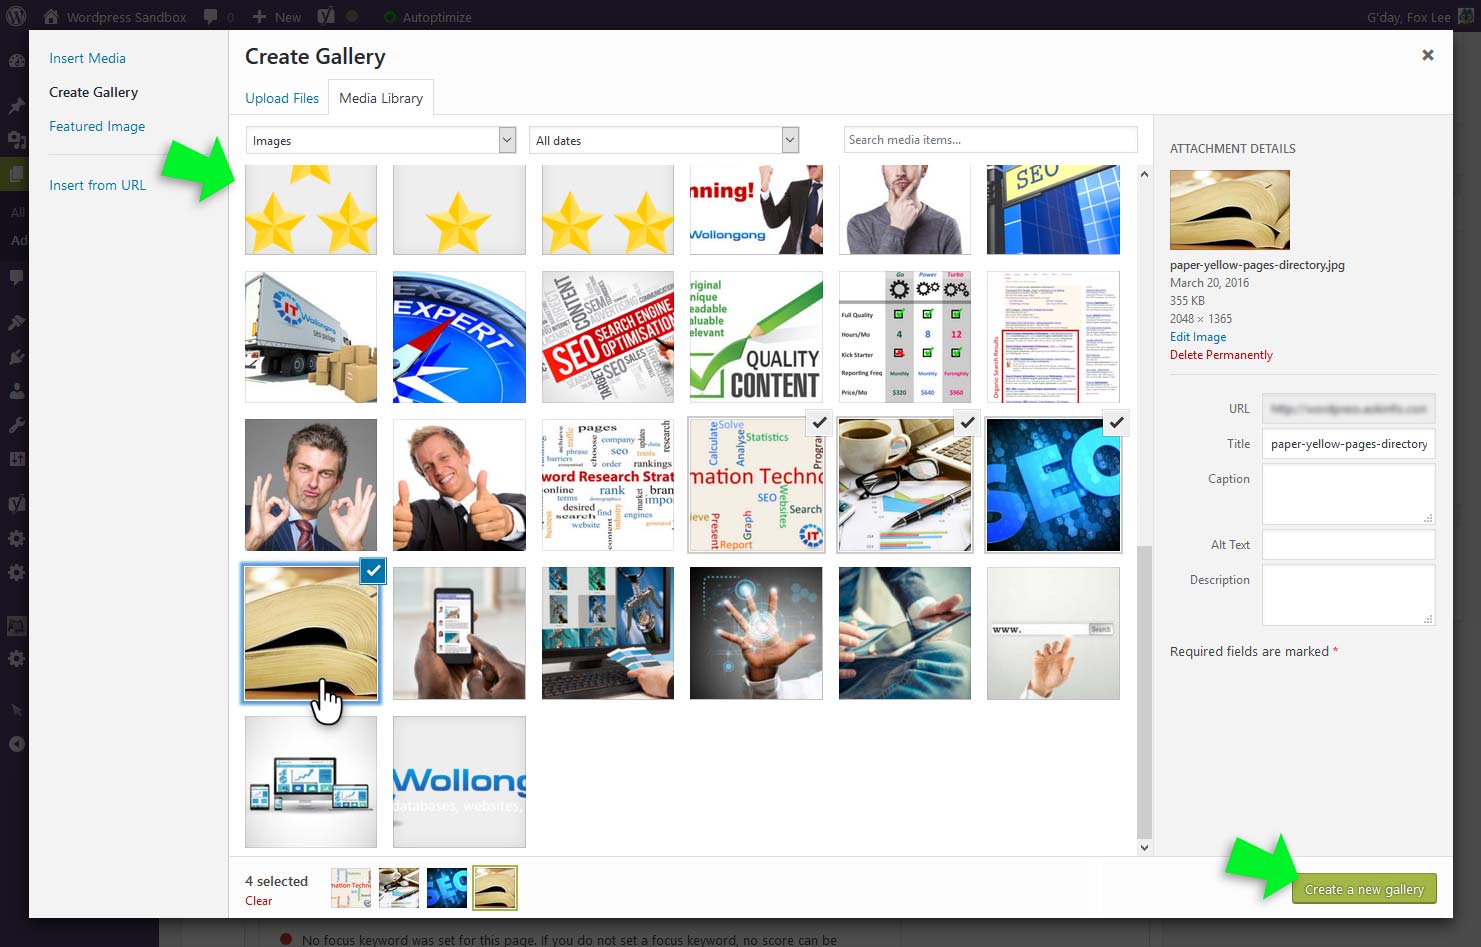
If you don’t see any items, make sure you have the “Media Library” tab selected near the top of the window. If there are no items in your media library, you will instead need to select the “Upload Files” tab and add your images to the library.
Once you have selected all the images you want to include, click the “Create New Gallery” button near the bottom of the window.
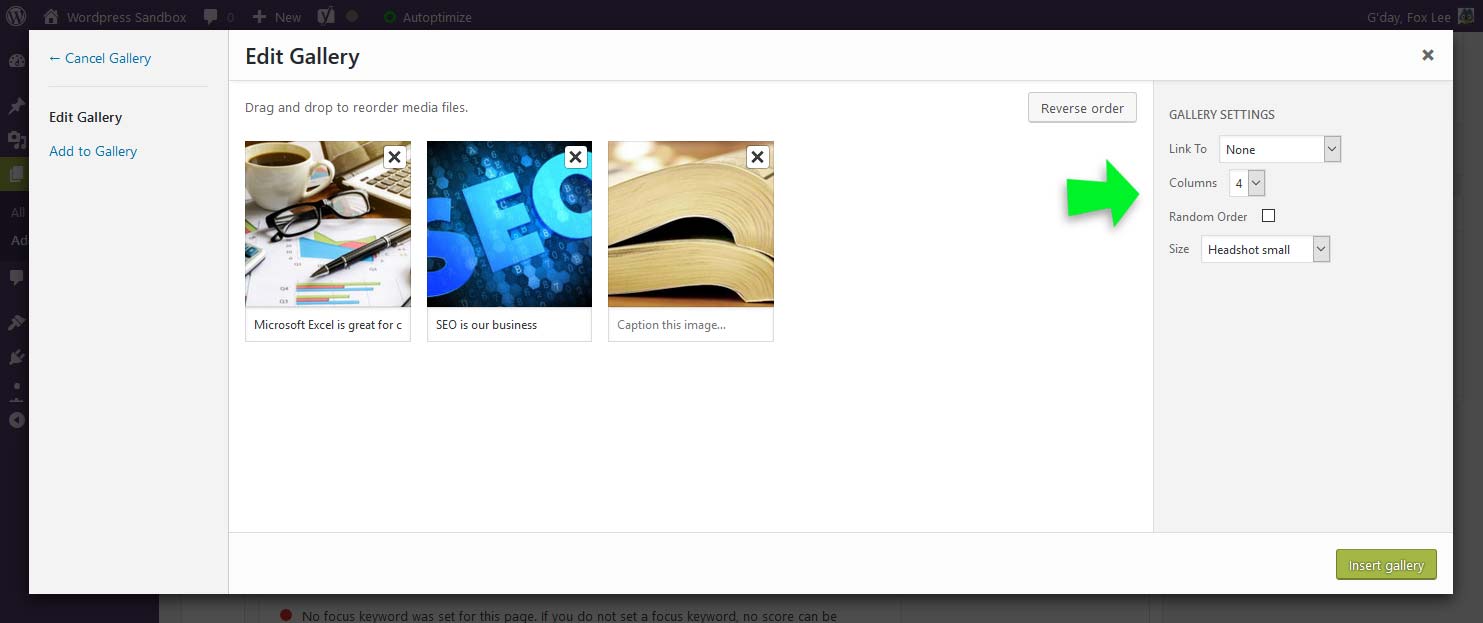
Step 4: Set Up Gallery Options
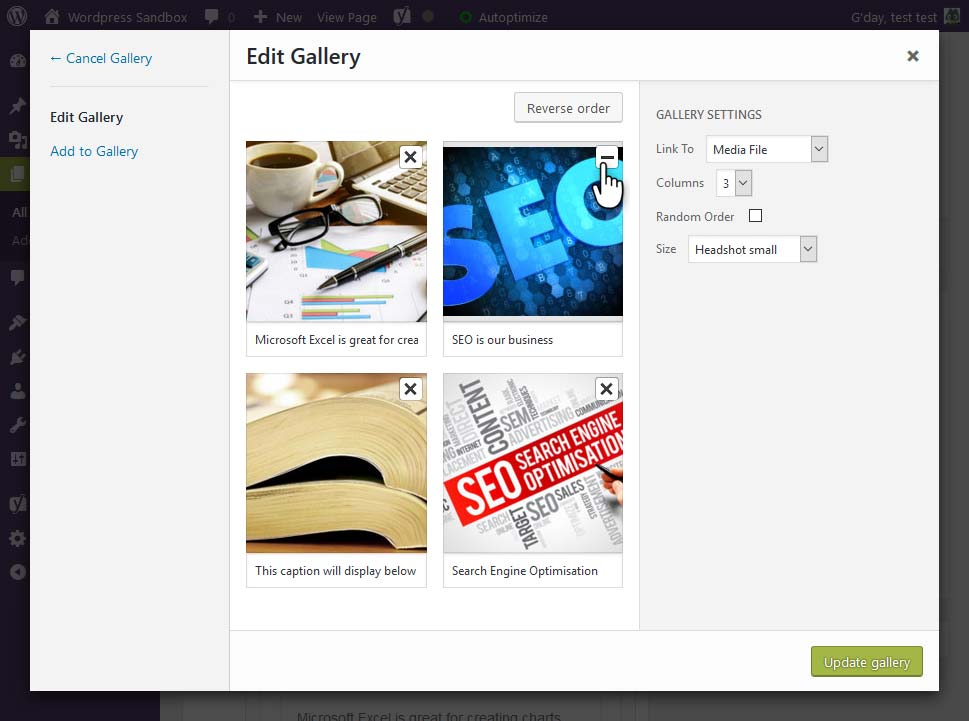
Now you will see the “Edit Gallery” window. It looks similar to the media library screen, but now you will only see thumbnails for items you chose to include in your gallery.
The right-hand panel shows options for how the gallery will be displayed to visitors. The exact appearance your visitors see, will depend on your active theme, as the theme is what has final control over visual styles.
You are free to choose different settings for each gallery you create, even for two galleries on the same page. However, it’s best to avoid making them too wildly different. That way, you have a consistent look that will be pleasing to visitors.
The settings are:
- Link to: You can choose whether to have the gallery thumbnails link to the full-size image file, or to an automatically-generated page presenting the file (not recommended). You can also choose no link.
- Columns: Images in the gallery will display in a grid. This setting determines how many columns should be in the grid, provided there is enough space. The actual number may change based on your theme and the width of your screen. For example, the gallery will probably collapse down into one column when viewed on a smartphone, rather than appearing as super tiny thumbnails.
- Random Order: You can drag and drop the images in your gallery to change their order. If you don’t want to choose a particular order, you can turn on this option to sort the images randomly instead.
- Size: This determines the size of the image thumbnail that will be displayed. WordPress has several built-in sizes to choose from, and your theme may also add some sizes (the above example uses a custom size we added). For best results, you should pick a size which has fixed proportions – for example, the built in size “thumbnail” is always cropped to a square, regardless of the proportions of the original image. This will ensure that your galleries look nice and neat at any screen size.
Step 5: Provide Captions and Other Info
In addition to choosing the settings for your gallery, you need to also fill in the details for each individual image. Do this by clicking on the image thumbnail in the main panel. This will load details for that image in the right-hand panel, where you can edit them.
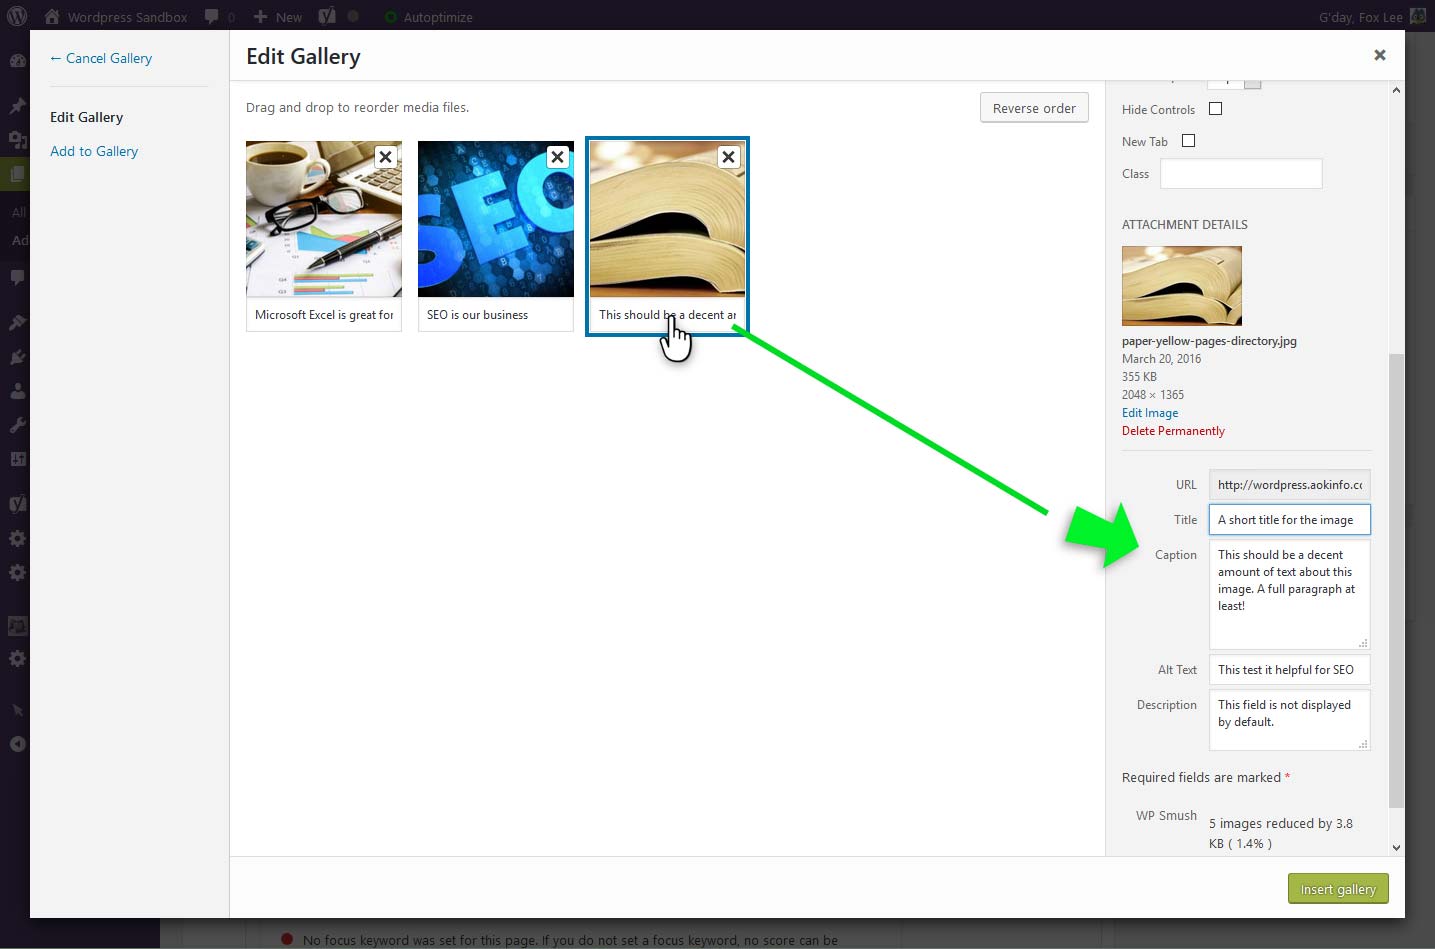
The Title and Description will not be displayed by default, though it’s not a bad idea to fill them in. However, the Alt text and Caption are very important, and should always be completed.
- Caption: If provided, this text will be displayed in the gallery below the image. It can be a short label, or a quite lengthy description if you prefer. However, if you choose a small image size (or have many items per row), you may not have room for a long caption.You can use simple HTML in a caption. For example, entering the text <br /> will insert a line break.
- Alt text: Every image on your page should have alt text. It will help search engines like Google identify the content of the image, as well as providing vital information for vision-impaired readers. The alt text should be a brief description of what’s in the image.
Important: The Title, Description, Caption and Alt Text are associated with the image in your media library, which affects your entire site. If you place an image in more than one gallery, even on different pages, those properties will be the same in every gallery. This behaviour is built into WordPress, so you can only change it by using a gallery plugin (or theme) that changes how galleries work.
Step 6: Finalise the Gallery and Save the Page/Post
Once you are satisfied with your gallery, click the “Insert gallery” button in the bottom right corner.

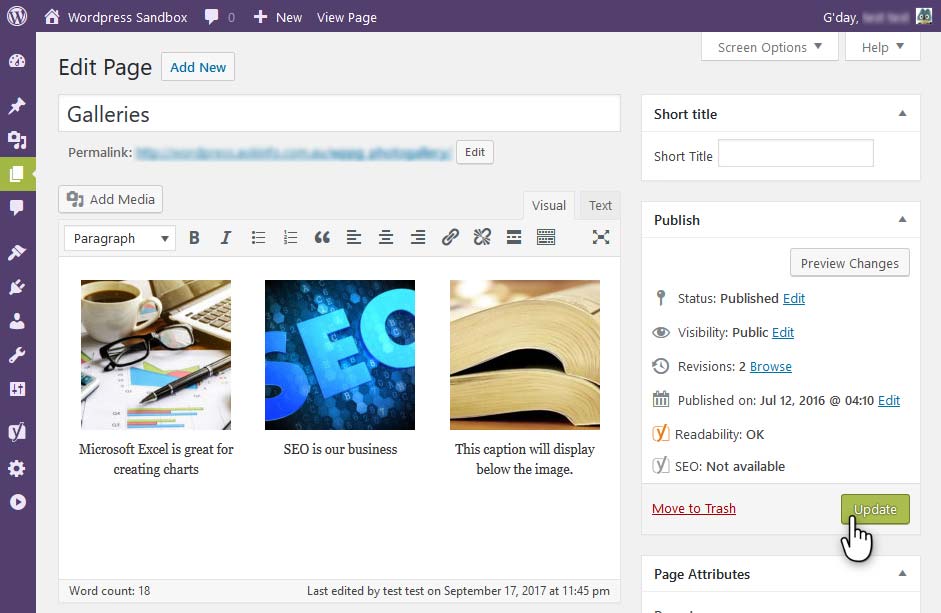
You will be returned to the page you were editing, but you can now see a rough layout of the gallery in the editing area. This is only a mock-up, and doesn’t show exactly how the gallery will appear outside the editing interface. To see a preview, click the “preview changes” button on the right-hand panel.
Finally, save the page (click the Publish or Update button) to save your changes!
Editing Galleries
This section will show you how to edit an existing gallery. Remember, after making any changes to a gallery, you must also click Update to save the page or post you are working on.
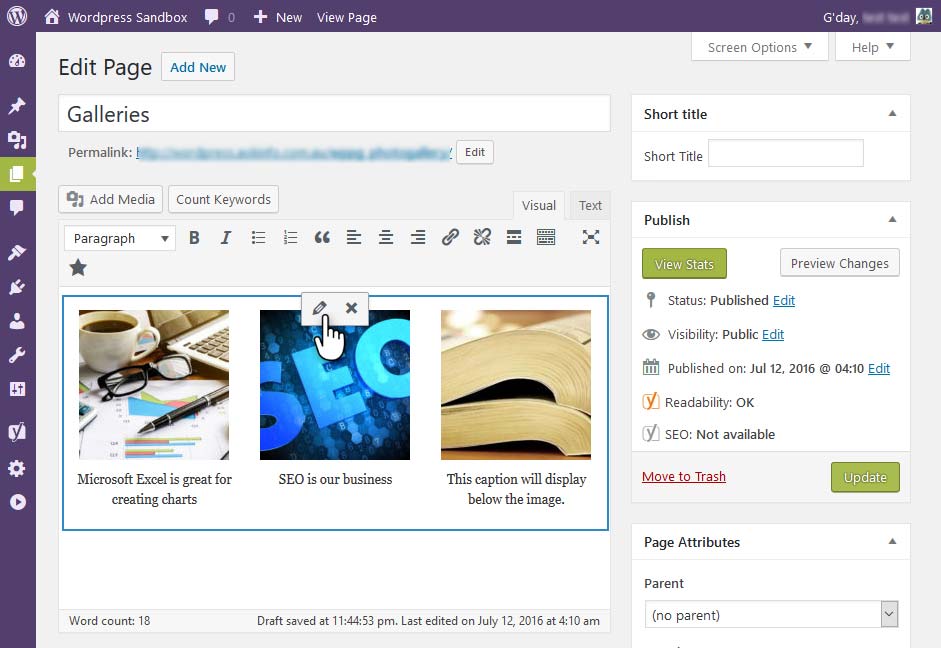
Step 1: Select the Galley to Edit
In the text editing area, click on the gallery layout preview. A blue outline will appear around the gallery, and a small toolbar will pop up with two buttons. Click on the pencil to edit the gallery.
Step 2: Make Your Desired Edits
This will open the Edit Gallery screen. This is the same screen as we saw in Step 4 when creating the gallery. From here, we can update the gallery options, captions and other information, just as we did when we created the gallery.
To add or remove images, follow the additional steps below.
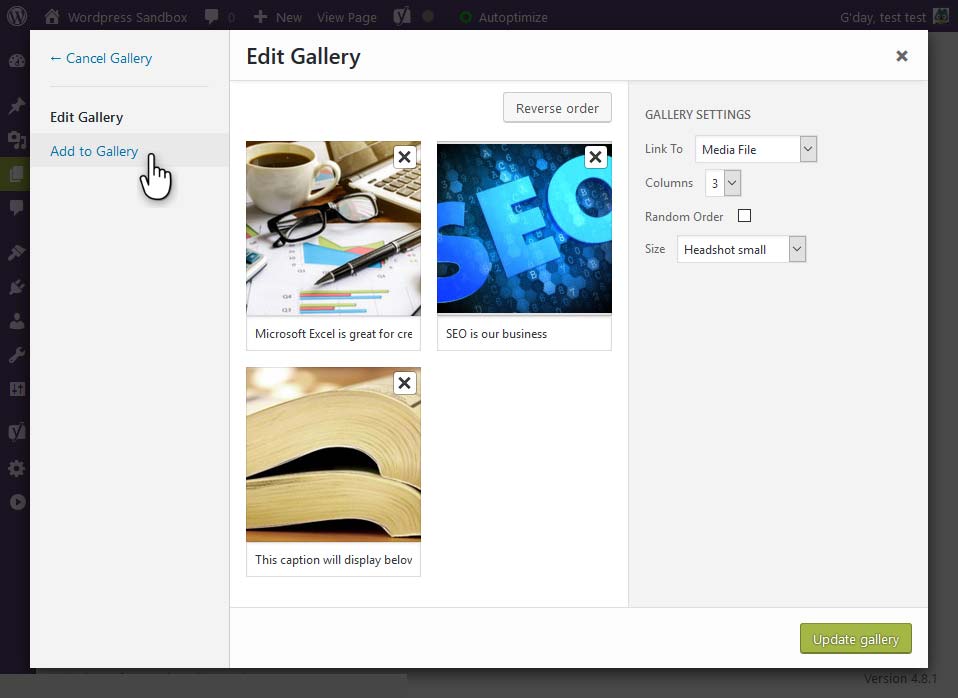
Option A: Adding Images to an Existing Gallery
Step A1: Open the Media Library
To add more images to an existing gallery, go to the left side panel and click the “Add to Gallery” link.
Step A2: Select Images to Add
This will bring up the media library, just like when we created the gallery. But this time, images that are already in this gallery won’t appear.
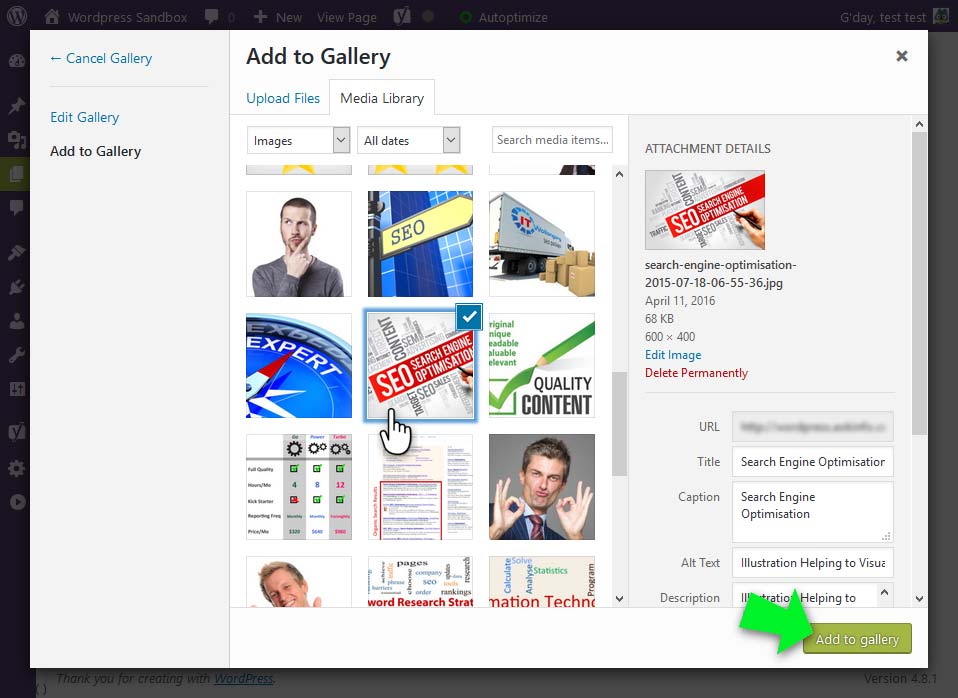
Select the images you want to add to the gallery, which will be marked with a blue check mark (like when we created the gallery).
Step A3: Add the Images
When you have made your selection, click the “Add to gallery” button in the bottom right corner.
Step A4: Continue with the new images
Now you can work with the gallery including the images you just added. When you’re done, click the “Update Gallery” button, in the bottom right corner, to finish.
Option B: Removing Images from a Gallery
Step B1: Locate the image(s) to be removed
From the gallery editing screen, locate the thumbnail for the image you want to remove. Over the top right corner of the thumbnail, you will see a button showing ×.
Step B2: Remove the image(s)
Click the × button, and the image will be removed from the gallery.
This will not delete the image from your media library. It will only be removed from the gallery you are currently editing.
After deleting the chosen images, click the “Update gallery” button in the bottom right corner.
Step 3: Don’t Forget to Save!
When you finish working with your gallery and return to the text editing interface, don’t forget to save! Click the “Update” button (or the “Publish” button, if the post is currently a draft) to save your work.